Volumetric Fog and Lighting in Unreal Engine 4
Volumetric lighting is something I've been using more and more in my projects and slowly, I'm starting to get the hang of it. With each new version of Unreal some interesting updates happen. Unreal Engine recently had a fantastic session at GDC 2018 covering this. Here are the main points.
The first thing you'll need to create is a simple Directional Light. This represents the direction of the light from the sun.
The Skylight is the indirect lighting that gets caught in the atmosphere. It comes from all directions back into the scene. The Skylight takes a cube map from the skydome image and gives precise richer colors and more light bounces. These can be configured in the World Settings under Num Sky Lighting Bounces.
Volumetric lightmaps have replaced the sparse volume lightmap system and now has many more samples and a much larger density. This can be adjusted for larger scenes in the World Settings under Lightmass. Volumetric Lighting Detail Cell Size and Volumetric Lightmap Maximum Brick Memory MB.
Next, add an Exponential HeighFog node. Setting the Fog Density to the required level will produce a standard video game fog yet this is incorrect as real fog doesn't behave like this, especially when under cover or inside buildings. Turn on the volumetric Fog and the scene will instantly change. Colour is being taken from the Directional light and the Skylight, as well as any Fog color that has been selected.
Any new lights added to the scene can be used to light up the fog. This can be found in the Volumetric Scattering intensity. Particle effects can also affect the fog by changing the radius scale in the Light module.
Light Shafts will be created in the scene with a strong directional Light and cast shadows turned on.
Further down the directional light settings, the Light Shaft menu can be found. Turn on either Light Shaft Bloom (Godrays by brightening the scene) or Light Shaft Occlusion (Godrays by darkening the scene)
However, let's say for example you want the fog to be thicker in certain locations, and thinner in others to reveal environmental features. How can that be achieved? The answer is Local volumetric fog.
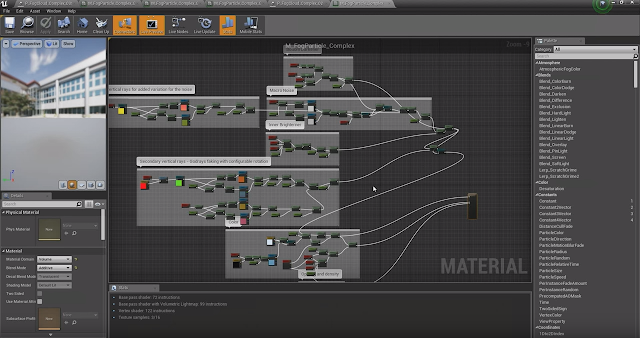
Local volumetric fog can be created by using the material editor and configuring that to be a volume material, which can then be used in a particle system which will render out like a fog.
Make a material like this. Make sure the Material Domain is set to Volume and the Blend Mode is set to Additive.

Now, make a particle system and set the material to the one you've just created above.
Initial Size and the Spawn rate can be adjusted individually as normal but you'll also need to add a location Cylinder Node, adjust the radius size to fit your scene requirements also.
You may decide rather than placing individual paticle systems in the scene, you can create custom block mesh for the areas of fog concentration.

The Fog particle system can then be applied to the scene, but a Skel Ver/Surf Location Node will need to be added. This will spawn the particle based on a mesh using the Skel Mesh Actor Param Name.

In the Particle Details now select the Actor (mesh in the scene) and then select the mesh and add an invisible material to it.
As the fog is built using a material structure, this means that you can start to add all sort of extra things from macro noise, inner brightness, bottom dullness, opacity and density changes. Some amazing effects can be achieved.

Thank you to the Epic Team for continuing to build and update a amazing game engine, to watch the full video of this Unreal Engine GDC 2018 feature by Sjoerd De Jong click below:
https://www.youtube.com/watch?v=Xd7-rTzfmCo
The first thing you'll need to create is a simple Directional Light. This represents the direction of the light from the sun.
The Skylight is the indirect lighting that gets caught in the atmosphere. It comes from all directions back into the scene. The Skylight takes a cube map from the skydome image and gives precise richer colors and more light bounces. These can be configured in the World Settings under Num Sky Lighting Bounces.
Volumetric lightmaps have replaced the sparse volume lightmap system and now has many more samples and a much larger density. This can be adjusted for larger scenes in the World Settings under Lightmass. Volumetric Lighting Detail Cell Size and Volumetric Lightmap Maximum Brick Memory MB.
Next, add an Exponential HeighFog node. Setting the Fog Density to the required level will produce a standard video game fog yet this is incorrect as real fog doesn't behave like this, especially when under cover or inside buildings. Turn on the volumetric Fog and the scene will instantly change. Colour is being taken from the Directional light and the Skylight, as well as any Fog color that has been selected.
Any new lights added to the scene can be used to light up the fog. This can be found in the Volumetric Scattering intensity. Particle effects can also affect the fog by changing the radius scale in the Light module.
Light Shafts will be created in the scene with a strong directional Light and cast shadows turned on.
Further down the directional light settings, the Light Shaft menu can be found. Turn on either Light Shaft Bloom (Godrays by brightening the scene) or Light Shaft Occlusion (Godrays by darkening the scene)
However, let's say for example you want the fog to be thicker in certain locations, and thinner in others to reveal environmental features. How can that be achieved? The answer is Local volumetric fog.
Local volumetric fog can be created by using the material editor and configuring that to be a volume material, which can then be used in a particle system which will render out like a fog.
Make a material like this. Make sure the Material Domain is set to Volume and the Blend Mode is set to Additive.

Now, make a particle system and set the material to the one you've just created above.
Initial Size and the Spawn rate can be adjusted individually as normal but you'll also need to add a location Cylinder Node, adjust the radius size to fit your scene requirements also.
You may decide rather than placing individual paticle systems in the scene, you can create custom block mesh for the areas of fog concentration.

The Fog particle system can then be applied to the scene, but a Skel Ver/Surf Location Node will need to be added. This will spawn the particle based on a mesh using the Skel Mesh Actor Param Name.

In the Particle Details now select the Actor (mesh in the scene) and then select the mesh and add an invisible material to it.
As the fog is built using a material structure, this means that you can start to add all sort of extra things from macro noise, inner brightness, bottom dullness, opacity and density changes. Some amazing effects can be achieved.


Thank you to the Epic Team for continuing to build and update a amazing game engine, to watch the full video of this Unreal Engine GDC 2018 feature by Sjoerd De Jong click below:
https://www.youtube.com/watch?v=Xd7-rTzfmCo