Posts

Showing posts from February, 2017

Unreal 4 Lighting Academy with 51Daedalus - Part 1

Image
A friend recently recommended this series as an excellent example of how to do lighting properly in the Unreal engine, and I couldn't agree more. 51Daedalus breaks down the scene and gives great feedback with tips and tricks how to make the lighting even better. If you have a few hours to educate yourself, check out the full series using the link below. https://www.youtube.com/playlist?list=PLqfZolvobgUDAm-c41cDR8NDA79UKuN4b There is a lot of information to process, and I've done my best to capture most of it, this blog isn't about copying the information but rather one of my own notes and make sure that I full understand it. Before starting really explore the scene description, what does the level needs to achieve, review all the reference material and develop the mood and feeling it will evoke. The technology is pretty straight forward, it gives the Artist the tools to be totally expressive without restrictions, however the Artist needs to have the knowledge and traini...

Workflow level design (in Unreal Engine 4)

Image
Much of this information has been discussed for years from the very first editions of Dungeons and dragons up to VR immersive story telling experiences. There isn't anything new here, but its all worth remembering because it's a tried and test method that works no matter the project. Unreal Engine have some great tutorials on youtube if you're looking for practical experience rather than just theory. So, just what is a level? A planned space or series of missions created within a pre-made constructed area designed to allow the player to experience a series of events. Then what's the difference between Level Design and Environmental Art? Level Designers: Sketches level blueprints Coordinate placement of enemies Mark where to trigger certain events Provide visual or auditory cues for guidance Use game mechanics to immerse the player Environmental Artists: Design a consistent visual theme to the level Provide visual cues for guidance Use visual methods to immerse the pla...

UE4 - Checking a scene and Optimization

Image
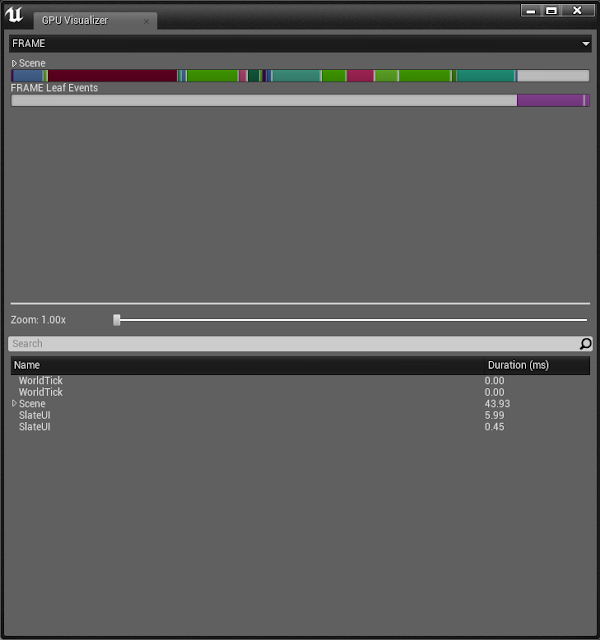
When building a scene it's important to check the GPU visualizer (ctrl,shift and ,) regularly to see where the resources are being used and how you can manage them better. Statistics gives you an in-depth review of all the assets in the scene, you can check a lot of important information here very quickly and is an absolute must for scene optimization. The Buffer Visualization will give you a quick overview of all render elements. Unlit view Lightmap Density (Red being bad) Shader complexity (red being bad, this scene has some problems...) Light complexity Lighting only Metallic only reflections only Scene depth Final Screenshot from project!

Some Fancy UE4 Material Blueprints

Image
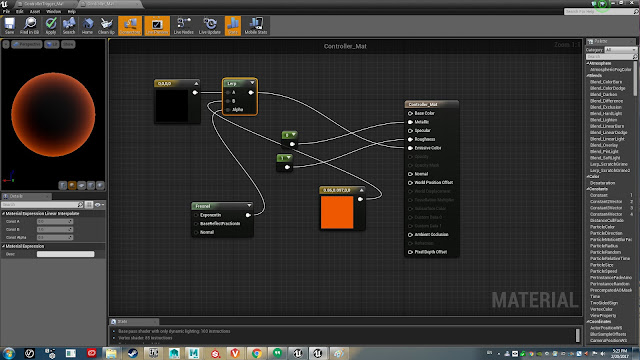
Following from basic materials I started to explore more complex once, the examples below have been pulled from our latest project and have been carefully constructed by my excellent colleague Kevin Lee. (Read his blog here: https://jia-weilee.blogspot.tw/) The material below gives transparent objects and emissive glow, what's good about this is it's using a lerp and a fresnel reflection rather than a full object glow. This material can be then made to pulse by adding a 'cosine' node into the Alpha Lerp channel. Making it rain is a difficult effect to get right, but I think this is material does a great job, I'd like to use this again and add more attributes within an instance. Using a Panner node into the world displacement with a tessellation multiplier can create amazing effects. Lastly, this simple material made me rethink about how we use the RGB channels to apply three colour tints into one material. I'm sure with future development, this can be used for s...

Simple Materials in UE4

Image
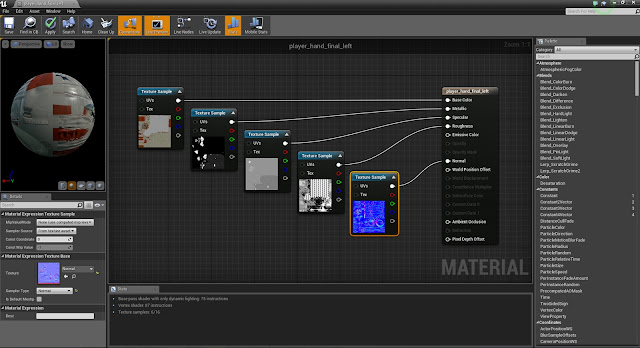
With a few hectic months out of the way and a change of direction, I'm moving away from modeling and more into UE4 layout and lighting. Hopefully, I can continue to build scene models but currently, there just isn't the need in the department. The basic blueprint for 'texture' into 'material' is simple enough and one that most model makers understand. Base, specular, roughness, emissive and normal maps. This is fine for simple projects but material 'instances' are better for great control within a dynamic pipeline. 'Parameters' are all used as much as possible. These are great for setting a minimum and maximum range and can be easily adjusted. Below is an example of a material ready to be instanced. It has parameter control with an emissive red (this can also be a parameter colour but the logo design is already red so that colour is locked down) and with a nice normal multiplier. This is done through the blue channel as plugging in a simple value...