Workflow level design (in Unreal Engine 4)
Much of this information has been discussed for years from the very first editions of Dungeons and dragons up to VR immersive story telling experiences. There isn't anything new here, but its all worth remembering because it's a tried and test method that works no matter the project. Unreal Engine have some great tutorials on youtube if you're looking for practical experience rather than just theory.
So, just what is a level?
A planned space or series of missions created within a pre-made constructed area designed to allow the player to experience a series of events.
Then what's the difference between Level Design and Environmental Art?
Level Designers:
Sketches level blueprints
Coordinate placement of enemies
Mark where to trigger certain events
Provide visual or auditory cues for guidance
Use game mechanics to immerse the player
Environmental Artists:
Design a consistent visual theme to the level
Provide visual cues for guidance
Use visual methods to immerse the player
Preproduction:
Know Your Game, the brief will often state which Mechanics and Genre the player will experience. The environment needs to be enjoyable, immersive and fun.
Brainstorm all the possible game mechanics and don’t forget to list all the combinations too. After discussing what experience the mechanic will convey start exploring the aesthetic theme of the game.
Storyboard the rough narrative experience and sketch out a room and description of what's happening and when. Indicate the sequence of mechanics used and order these sketches into a sequence based on the narrative. Keep reviewing the experience and updating the sketches.
The sketches can then become more detailed with specific details such as lighting, trigger boxes, NCPs, enemy objects, player start and exits.
Connected the room sketches into a full level and finalize with department leads.
Production:
1. Prototype Pass
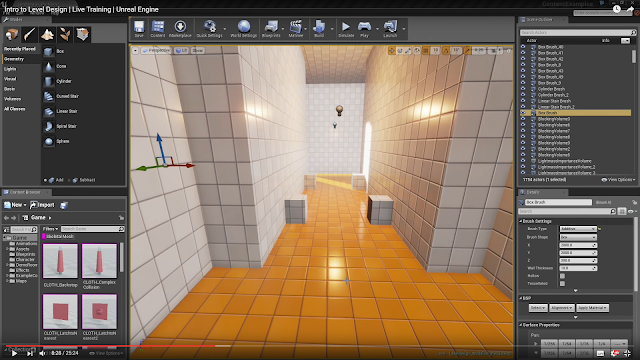
This is a very basic block structure to represent the game level. No textures, materials or meshes are added. This is the first stage to test the game play mechanics and build the level. It's easier to plan and adapt the scene as you play it. This allows you to make huge changes quickly and try out ideas. This stage is all about working out the foundation layout and building upon it.
This is from Dan Taylor's blog which is excellent and spot on. Below is the summery of the essential top 10 principles of good level design. (http://www.gamasutra.com/blogs/DanTaylor)
Is fun to navigate – It uses a clear visual language to guide the player along the primary path, and creates interest through verticality, secondary paths, hidden areas and maze elements.
Does not rely on words to tell a story – Aside from the explicit narrative called out by story and objectives, good level design delivers implicit narrative trough the environment, and provides players with gameplay choice from which to create their own emergent narrative.
Constantly teaches the player something new – It keeps the player engaged by continuously introducing new mechanics all the way through the game, and prevents old mechanics from becoming stale by applying modifiers or reusing them in unusual ways.
Is surprising – Classic Aristotelian pacing is not always appropriate for an interactive medium, and it is not enough to simply pace all your levels to the standard “rollercoaster” model. Good level design is not afraid to take risks with the pace, aesthetics, locale and other elements to create an experience that is fresh.
Empowers the player – Videogames are escapism and, as such, should eschew the mundane. Furthermore, good level design reinforces players’ empowerment by allowing them to experience the consequences of their actions, in both the immediate, moment-to-moment gameplay, and in the long term, through the holistic design of all levels.
Allows the player to control the difficulty – It gears the main path toward players of basic ability, presenting advanced players with optional challenge through clearly communicated opportunities of risk and reward.
Is efficient – Resources are finite. Good level design creates efficiencies through modularity, bi-directional gameplay and integrated, exploratory bonus objectives that make use of the whole play-space.
Creates emotion – it begins at the end, with the desired emotional response, and works backwards, selecting the appropriate mechanics, spatial metrics and narrative devices to elicit that response.
Is driven by the game’s mechanics – above all, it showcases the game’s mechanics through the medium of the level, to reinforce the uniquely interactive nature of videogames.
2. Mesh Pass
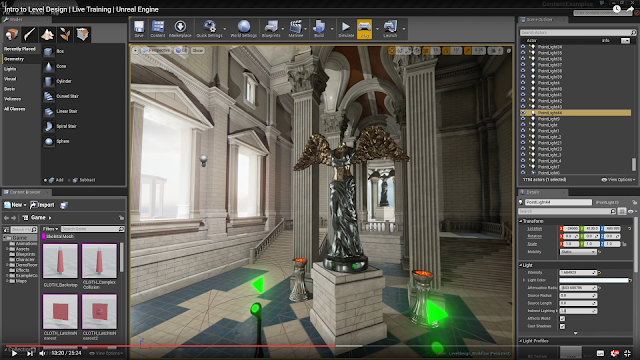
The scene is not changed but the basic blocks are replaced with Meshes, materials and textures. The game play mechanics remain the same and a great level of detail and blueprints are cleaned up. The level design will immediately be able to see and play the level, continually testing the scene and making sure everything is working correctly and the level plays will and makes sense withing the narrative story.
3. Lighting Pass
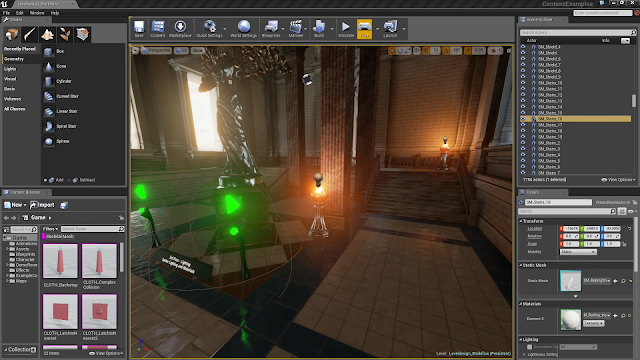
Sounds simple, just add the lights and sound as this stage. Sure, this is the right point to get them into the scene but it's no small task. Each of these elements if done badly or are just plan wrong, or even missing will immediately break the player experience. Having the time to adjust and get everything right is essential. Lighting in Unreal is pretty fantastic. You can really play with the scene and start building some impressive results within just a few hours.
Unreal Engine 4 has four light types: Directional, Point, Spot, and Sky.
Directional lights are primarily used as your primary outdoor light or any light that needs to appear as if it is casting light from extreme or near infinite distances.
Point lights are your classic "light bulb" like light, emitting light in all directions from a single point.
Spot lights emit light from a single point, but have their light limited by a set of cones.
Sky lights capture the background of your scene and apply it as lighting to your level's meshes.
These lights are either Static, Stationary or movable. Static and stationary are used to 'bake' lighting but movable light can not be baked. The physical attributes are one thing, but baked lighting also depends of dynamic shadows. A light with dynamic shadows can not be baked even if it it is set as static. It's always work checking all the lights in the scene as dynamic lighting is expensive and will use a lot of resource.
Lighting is a complex beast and I'm still learning. I will write a separate blog about this sometime soon.
By default, Directional Lights, Spot Lights, Point Lights, and all Actors that can be affected by lights (Static Meshes, Skeletal Meshes, etc.) have Lighting Channel 0 enabled. If you would like a lightable Actor to be affected by another Lighting Channel, you must enable that channel on both the Actor and the light.
Reflections and sphere light maps
UE4 has support for real-time Planar Reflection that can give more accurate looking reflections than Screen Space Reflections (SSR) provide but come with a higher rendering cost. This higher rendering cost is due to how Planar Reflection works, as Planar Reflection actually renders the level again from the direction of the reflection. You can also use a capture sphere and then convert it into a material. This material can then be used in the skylight.
Lighting Channels
Lighting channels allow dynamic lights to only affect objects when their lighting channels overlap. This is primarily intended for cinematic use to give users powerful control over how actors are lit. At the moment, Unreal Engine supports up to 3 lighting channels.
IES Light Profiles
IES Light Profiles are a curve that defines light intensity in an arc that Unreal Engine 4 will "sweep" around an axis to make Point Lights and Spot Lights appear to be casting light more realistically, as if accounting for the reflective surfaces in the light fixture, the shape of the light bulb, and any lensing effects. The curve itself can be seen as a multiplier for the overall brightness of the light, as if you were projecting a texture from the light, but with out the texture overhead to do so or the errors that can occur when projecting at some angles.
4. Post processing Lighting
Unreal Engine provides Post Process Effects to allow artists and designers to tweak the overall look and feel of the scene. Examples of elements and effects include bloom (HDR blooming effect on bright objects), ambient occlusion, and tone mapping.The Post Process Volume is a special type of volume that can be added to a level and, because Unreal Engine 4 does not make use of post processing chains, these volumes are currently the only way to manipulate post processing parameters. The system is not complete and we will expose some programmability, but common cases to be handled very well by the system. This makes it easier for artists/designers to use the system and for programmers to optimize it.
Polish Pass
This is when the level is at the final stage and is ready to ship. These things will all fall into place quickly as the foundation was set and a solid workflow pipeline followed. Adding effects, final background music and sound effects with blocking volumes and reflection spheres to complete the level.
Once this is done it's best to check the scene again using GPU visualizer and buffer visualizations. (See previous post - 'UE4 - Checking a scene')
Before building, make sure to do some scene optimization. Check the fps and screen size percentage. It's about getting the balance right between visuals and frame rate. Of course, if you're output is for VR then you've got to factor this from the start of the project. A frame rate above 90 is usually preferred with tends to favour a low number of faces in the scene and 1-2k texture materials.
There are a lot of things to balance and get correct at the very start of the project, without these fundamentals you'll end up with an unsolvable wreck of a level and will in most cases need to start over.
So, just what is a level?
A planned space or series of missions created within a pre-made constructed area designed to allow the player to experience a series of events.
Then what's the difference between Level Design and Environmental Art?
Level Designers:
Sketches level blueprints
Coordinate placement of enemies
Mark where to trigger certain events
Provide visual or auditory cues for guidance
Use game mechanics to immerse the player
Environmental Artists:
Design a consistent visual theme to the level
Provide visual cues for guidance
Use visual methods to immerse the player
Preproduction:
Know Your Game, the brief will often state which Mechanics and Genre the player will experience. The environment needs to be enjoyable, immersive and fun.
Brainstorm all the possible game mechanics and don’t forget to list all the combinations too. After discussing what experience the mechanic will convey start exploring the aesthetic theme of the game.
Storyboard the rough narrative experience and sketch out a room and description of what's happening and when. Indicate the sequence of mechanics used and order these sketches into a sequence based on the narrative. Keep reviewing the experience and updating the sketches.
The sketches can then become more detailed with specific details such as lighting, trigger boxes, NCPs, enemy objects, player start and exits.
Connected the room sketches into a full level and finalize with department leads.
Production:
1. Prototype Pass

This is a very basic block structure to represent the game level. No textures, materials or meshes are added. This is the first stage to test the game play mechanics and build the level. It's easier to plan and adapt the scene as you play it. This allows you to make huge changes quickly and try out ideas. This stage is all about working out the foundation layout and building upon it.
This is from Dan Taylor's blog which is excellent and spot on. Below is the summery of the essential top 10 principles of good level design. (http://www.gamasutra.com/blogs/DanTaylor)
Is fun to navigate – It uses a clear visual language to guide the player along the primary path, and creates interest through verticality, secondary paths, hidden areas and maze elements.
Does not rely on words to tell a story – Aside from the explicit narrative called out by story and objectives, good level design delivers implicit narrative trough the environment, and provides players with gameplay choice from which to create their own emergent narrative.
Tells the player what to do, but not how to do it – It makes sure mission objectives are clearly communicated, but lets players complete them any way they like, and, where feasible, in any order.
Constantly teaches the player something new – It keeps the player engaged by continuously introducing new mechanics all the way through the game, and prevents old mechanics from becoming stale by applying modifiers or reusing them in unusual ways.
Is surprising – Classic Aristotelian pacing is not always appropriate for an interactive medium, and it is not enough to simply pace all your levels to the standard “rollercoaster” model. Good level design is not afraid to take risks with the pace, aesthetics, locale and other elements to create an experience that is fresh.
Empowers the player – Videogames are escapism and, as such, should eschew the mundane. Furthermore, good level design reinforces players’ empowerment by allowing them to experience the consequences of their actions, in both the immediate, moment-to-moment gameplay, and in the long term, through the holistic design of all levels.
Allows the player to control the difficulty – It gears the main path toward players of basic ability, presenting advanced players with optional challenge through clearly communicated opportunities of risk and reward.
Is efficient – Resources are finite. Good level design creates efficiencies through modularity, bi-directional gameplay and integrated, exploratory bonus objectives that make use of the whole play-space.
Creates emotion – it begins at the end, with the desired emotional response, and works backwards, selecting the appropriate mechanics, spatial metrics and narrative devices to elicit that response.
Is driven by the game’s mechanics – above all, it showcases the game’s mechanics through the medium of the level, to reinforce the uniquely interactive nature of videogames.
2. Mesh Pass

The scene is not changed but the basic blocks are replaced with Meshes, materials and textures. The game play mechanics remain the same and a great level of detail and blueprints are cleaned up. The level design will immediately be able to see and play the level, continually testing the scene and making sure everything is working correctly and the level plays will and makes sense withing the narrative story.
3. Lighting Pass

Sounds simple, just add the lights and sound as this stage. Sure, this is the right point to get them into the scene but it's no small task. Each of these elements if done badly or are just plan wrong, or even missing will immediately break the player experience. Having the time to adjust and get everything right is essential. Lighting in Unreal is pretty fantastic. You can really play with the scene and start building some impressive results within just a few hours.
Unreal Engine 4 has four light types: Directional, Point, Spot, and Sky.
Directional lights are primarily used as your primary outdoor light or any light that needs to appear as if it is casting light from extreme or near infinite distances.
Point lights are your classic "light bulb" like light, emitting light in all directions from a single point.
Spot lights emit light from a single point, but have their light limited by a set of cones.
Sky lights capture the background of your scene and apply it as lighting to your level's meshes.
These lights are either Static, Stationary or movable. Static and stationary are used to 'bake' lighting but movable light can not be baked. The physical attributes are one thing, but baked lighting also depends of dynamic shadows. A light with dynamic shadows can not be baked even if it it is set as static. It's always work checking all the lights in the scene as dynamic lighting is expensive and will use a lot of resource.
Lighting is a complex beast and I'm still learning. I will write a separate blog about this sometime soon.
By default, Directional Lights, Spot Lights, Point Lights, and all Actors that can be affected by lights (Static Meshes, Skeletal Meshes, etc.) have Lighting Channel 0 enabled. If you would like a lightable Actor to be affected by another Lighting Channel, you must enable that channel on both the Actor and the light.
Reflections and sphere light maps
UE4 has support for real-time Planar Reflection that can give more accurate looking reflections than Screen Space Reflections (SSR) provide but come with a higher rendering cost. This higher rendering cost is due to how Planar Reflection works, as Planar Reflection actually renders the level again from the direction of the reflection. You can also use a capture sphere and then convert it into a material. This material can then be used in the skylight.
Lighting Channels
Lighting channels allow dynamic lights to only affect objects when their lighting channels overlap. This is primarily intended for cinematic use to give users powerful control over how actors are lit. At the moment, Unreal Engine supports up to 3 lighting channels.
IES Light Profiles
IES Light Profiles are a curve that defines light intensity in an arc that Unreal Engine 4 will "sweep" around an axis to make Point Lights and Spot Lights appear to be casting light more realistically, as if accounting for the reflective surfaces in the light fixture, the shape of the light bulb, and any lensing effects. The curve itself can be seen as a multiplier for the overall brightness of the light, as if you were projecting a texture from the light, but with out the texture overhead to do so or the errors that can occur when projecting at some angles.
4. Post processing Lighting
Unreal Engine provides Post Process Effects to allow artists and designers to tweak the overall look and feel of the scene. Examples of elements and effects include bloom (HDR blooming effect on bright objects), ambient occlusion, and tone mapping.The Post Process Volume is a special type of volume that can be added to a level and, because Unreal Engine 4 does not make use of post processing chains, these volumes are currently the only way to manipulate post processing parameters. The system is not complete and we will expose some programmability, but common cases to be handled very well by the system. This makes it easier for artists/designers to use the system and for programmers to optimize it.
Polish Pass

This is when the level is at the final stage and is ready to ship. These things will all fall into place quickly as the foundation was set and a solid workflow pipeline followed. Adding effects, final background music and sound effects with blocking volumes and reflection spheres to complete the level.
Once this is done it's best to check the scene again using GPU visualizer and buffer visualizations. (See previous post - 'UE4 - Checking a scene')
Before building, make sure to do some scene optimization. Check the fps and screen size percentage. It's about getting the balance right between visuals and frame rate. Of course, if you're output is for VR then you've got to factor this from the start of the project. A frame rate above 90 is usually preferred with tends to favour a low number of faces in the scene and 1-2k texture materials.
There are a lot of things to balance and get correct at the very start of the project, without these fundamentals you'll end up with an unsolvable wreck of a level and will in most cases need to start over.
#Work smart, not harder.